OAuth 2.0 Authentication Examples
Overview
This tutorial-style guide has two primary goals:
- Explore how applications and end users can authenticate with RabbitMQ server using OAuth 2.0 rather than the traditional username/password pairs or x.509 certificates.
- Explore what it takes to set up RabbitMQ Server with OAuth 2.0 authentication mechanism across several authorization servers.
The guide is accompanied by a public GitHub repository which hosts all the scripts required to deploy the examples demonstrated on the guide.
Table of Contents
Basics
Management UI Access
- Access management UI using OAuth 2.0 tokens
- Service-Provider initiated logon
- Identity-Provider initiated logon
Using JWT tokens in several protocols to access RabbitMQ
- Management REST API
- AMQP 0-9-1 (and scopes for topic exchanges in a separate section)
- AMQP 1.0
- JMS
- MQTT
Signing Keys, Scope Aliases, Rich Authorization Requests
- How to Use Advanced OAuth 2.0 Configuration
- Using a custom scope field
- Using multiple asymmetrical signing keys
- Using scope aliases
- Using variable expansion in scopes
- Preferred username claims
- Using Rich Authorization Requests tokens
Examples for Specific OAuth 2.0 Identity Providers
- Keycloak
- Auth0
- Microsoft Entra ID (formerly known as Azure Active Directory)
- OAuth2 Proxy
- Okta
- Google NOT SUPPORTED
- Multiple OAuth 2.0 servers and/or audiences
Examples for Tanzu RabbitMQ (commercial-only feature)
Prerequisites Used by the Examples in This Guide
- Docker must be installed
- Ruby must be installed
- make
- A local clone of a GitHub repository for branch
nextthat contains all the configuration files and scripts used on this example. - The following entries must be in your
/etc/hostsfile:
127.0.0.1 localhost uaa rabbitmq
Getting started with UAA and RabbitMQ
To demonstrate OAuth 2.0 you need, at least, an OAuth 2.0 authorization server and RabbitMQ appropriately configured for the chosen authorization server. This guide uses UAA as authorization server to demonstrate basic and advanced configuration to access to the Management UI and various messaging protocols.
This guide also demonstrates how to configure RabbitMQ to use other authorization servers besides UAA such as Keycloak. The table of content of this guide has the full list of authorization servers.
Run the following two commands to start UAA and RabbitMQ configured for UAA:
make start-uaato get UAA server runningmake start-rabbitmqto start RabbitMQ server
The last command starts a RabbitMQ with a specific configuration file, rabbitmq.conf.
Access management UI using OAuth 2.0 tokens
The RabbitMQ Management UI can be configured with one of these two login modes:
- Service-Provider initiated logon: this is the default and traditional OAuth 2.0 logon mode.
When the user visits the RabbitMQ Management UI, it shows a button with the label
Click here to logon. When the user clicks it, the logon process starts by redirecting to the configured authorization server. - Identity-Provider initiated logon: this mode is opposite to the previous mode.
The user must first access the RabbitMQ Management's
/loginendpoint with a token. If the token is valid, the user is allowed to access the RabbitMQ Management UI. This mode is very useful for Web sites which allow users to access the RabbitMQ Management UI with a single click. The original Web site get a token on user's behalf and redirects the user to the RabbitMQ Management's/loginendpoint.
Service-Provider initiated logon
The first time an end user arrives to the management UI, they are redirected to the configured OAuth 2.0 provider to authenticate. Once they successfully authenticate, the user is redirected back to RabbitMQ with a valid access token. RabbitMQ validates it and identify the user and its permissions from the token.
    [ UAA ] <----2. auth----    [ RabbitMQ ]
            ----3. redirect-->  [  http    ]
                                  /|\
                                   |
                            1. rabbit_admin from a browser
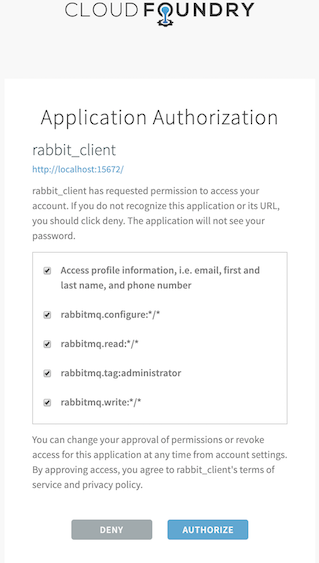
At step 2, if this is the first time the user is accessing RabbitMQ resource, UAA will prompt the user to authorize RabbitMQ application as shown on the screenshot below.
UAA has previously been configured with two users:
rabbit_admin:rabbit_admin- and
rabbit_monitor:rabbit_monitor
First visit https://uaa:8443 so that your browser can trust the self-signed
certificate uua has. Otherwise, the management UI will fail to connect to
uaa.
Now navigating to the local node's management UI and login using any of those two users.
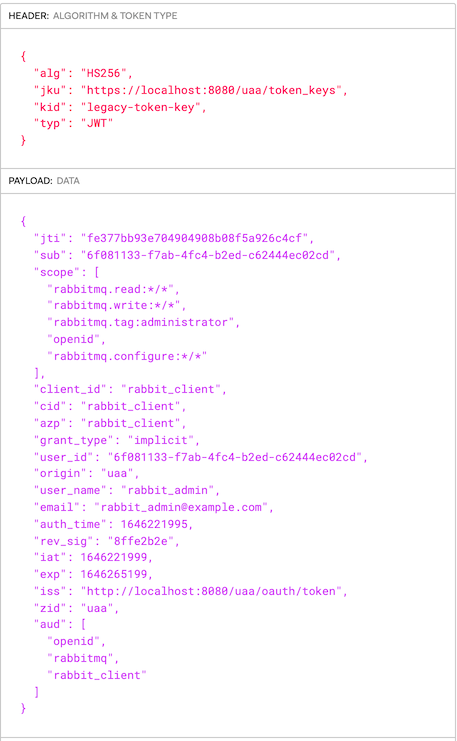
This is a token issued by UAA for the rabbit_admin user thru the redirect flow you just saw above.
It was signed with the symmetric key.
To configure the RabbitMQ Management UI with OAuth 2.0, the following configuration entries are required
in rabbitmq.conf:
# ...
management.oauth_enabled = true
management.oauth_client_id = rabbit_client_code
auth_oauth2.issuer = https://uaa:8443
# ...
You only need to set management.oauth_provider_url when you have not configured
auth_oauth2.issuer and/or they have different URLs.
Identity-Provider initiated logon
Like Service-Provider initiated logon, with Idp-initiated logon users get to the RabbitMQ Management UI with a valid token. The following scenarios are examples of Idp-initiated logon:
- RabbitMQ is behind a web portal which conveniently allow users to navigate directly to RabbitMQ fully authenticated.
- There is an OAuth2 proxy in between users and RabbitMQ which intercepts their requests and forwards them to RabbitMQ inserting the token into the HTTP
Authorizationheader.
The latter scenario is demonstrated here. The former scenario is covered in the following section.
Idp-initiated Logon using the Login Endpoint
A Web portal offers their authenticated users the option to navigate to RabbitMQ
by submitting a form with their OAuth token in the access_token form field as provided below:
    [ Idp | WebPortal ] ----> 2. /login [access_token: TOKEN]----   [ RabbitMQ Cluster ]
              /|\                                                               |
               |                                                                |
     1. rabbit_admin from a browser <-----3. 302 redirect to RabbitMQ w/cookie--+
If the access token is valid, RabbitMQ redirects the user to the Overview page with a cookie that carries the validated token. When RabbitMQ delivers the Overview page, it clears the cookie.
By default, the RabbitMQ Management UI is configured with service-provider initiated logon, to configure Identity-Provider initiated logon, the following configuration entries are required in rabbitmq.conf:
# ...
management.oauth_enabled = true
management.oauth_initiated_logon_type = idp_initiated
management.oauth_provider_url = http://localhost:8080
# ...
You only need to set management.oauth_provider_url when you have not configured
auth_oauth2.issuer and/or they have different URLs.
Important: when the user logs out, or its RabbitMQ session expires, or the token expires, the user is directed to the
RabbitMQ Management landing page which has a Click here to login button.
The user is never automatically redirected back to the url configured in the auth_oauth2.issuer.
It is only when the user clicks Click here to login , the user is redirected to the configured url in auth_oauth2.issuer.
This scenario is demonstrated here.
Using JWT tokens in several protocols to access RabbitMQ
The following subsections demonstrate how to use access tokens with any messaging protocol and also to access the management HTTP API.
Management REST api
In this scenario a monitoring agent uses RabbitMQ HTTP API to collect monitoring information.
Because it is not an end user, or human, you refer to it as a service account.
This service account could be our mgt_api_client client you created in UAA with the monitoring user tag.
This monitoring agent would use the client credentials or password grant flow to authenticate (1) with
UAA and get back a JWT token (2). Once it gets the token, it sends (3) a HTTP request
to the RabbitMQ management endpoint passing the JWT token within the Authorization header as a Bearer token.
[ UAA ]                  [ RabbitMQ ]
  /|\                    [  http    ]
    |                          /|\
    |                       3.http://broker:15672/api/overview passing JWT token
    |                           |
    +-----1.auth---------  monitoring agent
    --------2.JWT-------->
The following command launches the browser with mgt_api_client client with a JWT token previously obtained from UAA:
make curl-uaa url=http://localhost:15672/api/overview client_id=mgt_api_client secret=mgt_api_client
AMQP protocol
An application connects to RabbitMQ using AMQP protocol and presents a JWT Token as a credential. The application you are going to use is PerfTest which is not an OAuth 2.0 aware application. OAuth 2.0-aware application is covered in scenario four.
Instead you are launching the application with a token that you have previously obtained from UAA. This is just to probe AMQP access with a JWT Token. Needless to say that the application should instead obtain the JWT Token prior to connecting to RabbitMQ and it should also be able to refresh it before reconnecting. RabbitMQ validates the token before accepting it. If the token has expired, RabbitMQ will reject the connection.
First of all, an application which wants to connect to RabbitMQ using Oauth 2.0 must present a
valid JWT token. To obtain the token, the application must first authenticate (1.) with UAA. In case of a successful
authentication, it gets back a JWT token (2.) which uses it to connect (3.) to RabbitMQ.
[ UAA ]                  [ RabbitMQ ]
  /|\                    [  amqp    ]
    |                          /|\
    |                       3.connect passing JWT
    |                           |
    +-----1.auth---------  amqp application
    --------2.JWT-------->
You have previously configured UAA with these 2 OAuth 2.0 clients:
consumerproducer
In order to get a JWT token, an OAuth 2.0 client must be used.
Applications use the Oauth client grant flow to obtain a JWT token.
This the token issued by UAA for the consumer OAuth 2.0 client.

To launch the consumer application invoke the following command:
make start-perftest-consumer
To see consumer logs:
docker logs consumer -f
To launch the producer application invoke the following command:
make start-perftest-producer
To inspect producer logs:
docker logs producer -f
To stop all the applications call the following command:
make stop-all-apps
JMS protocol
In this use case you are demonstrating a basic JMS application which reads, via an environment variable (TOKEN),
the JWT token that will use as password when authenticating with RabbitMQ.
It is critically important to grant the required permission to the exchange jms.durable.queues.
Applications which send JMS messages require of these permissions:
rabbitmq.configure:*/jms.durable.queuesrabbitmq.write:*/jms.durable.queuesrabbitmq.read:*/jms.durable.queues
Those permissions grant access on all virtual hosts.
Before testing a publisher and a subscriber application you need to build a local image for the basic jms application by invoking this command:
make build-jms-client
To test a JMS application sending a message and authenticating via OAuth 2.0 run this command:
make start-jms-publisher
It sends a message to a queue called q-test-queue
Applications which subscribe to a JMS queue require of these permissions:
rabbitmq.write:*/jms.durable.queues
Those permissions grant access to all virtual hosts.
To test a JMS application subscribing to a queue and authenticating via OAuth 2.0 run this command:
make start-jms-subscriber
It subscribes to a queue called q-test-queue
MQTT protocol
This scenario explores the use case where you authenticate with a JWT token to RabbitMQ MQTT port.
Note: in this example, RabbitMQ is already configured with the rabbitmq_mqtt plugin.
This is no different than using AMQP or JMS protocols, all that matters is to pass an empty username and a JWT token as password. However, what it is really different is how you encode the permissions. In this use case you are going to proceed as you did it in the previous use case where you handcrafted the JWT token rather than requesting it to UAA. Here is the the scopes required to publish a message to a mqtt topic (scopes-for-mqtt.json)
{
  "scope": [
    "rabbitmq.write:*/*/*",
    "rabbitmq.configure:*/*/*",
    "rabbitmq.read:*/*/*"

  ],
  "extra_scope": "rabbitmq.tag:management",
  "aud": [
    "rabbitmq"
  ]
}
rabbitmq.write:*/*/* means allow write operation on a any vhost, on any exchange and any topic. In fact,
it is any "routing-key" because that is translated to a topic/queue.
You are going to publish a mqtt message by running the following command. If you have not run any of the
previous use cases, you need to launch rabbitmq first like this make start-rabbitmq.
make start-mqtt-publish TOKEN=$(bin/jwt_token scopes-for-mqtt.json legacy-token-key private.pem public.pem)
IMPORTANT: If you try to access the Management UI and authenticate with UAA using rabbit_admin you wont be able to do bind a queue with routing_key
testto theamq.topicexchange because that user in UAA does not have the required permissions. In our handcrafted token, you have granted ourselves the right permissions/scopes.
AMQP 1.0 protocol
In this use case you are demonstrating a basic AMQP 1.0 application which reads a JWT token from the PASSWORD environment variable.
The application then uses the token as a password when authenticating with RabbitMQ.
Before testing a publisher and a subscriber application you need to build a local image for the basic AMQP 1.0 application by invoking this command:
make build-amqp1_0-client
Launch RabbitMQ with the following command. It will start RabbitMQ configured with UAA as its authorization server:
make start-rabbitmq
Launch UAA:
make start-uaa
And send a message. It uses the client_id jms_producer, declared in UAA, to obtain a token:
make start-amqp1_0-publisher
Using Topic Exchanges
This section explains what scopes will be necessary for applications that use topic exchanges.
None of the users and/or clients declared in any of authorization servers provided by this tutorial have the appropriate scopes for topic exchanges. In the MQTT section, the application used a hand-crafted token with appropriate the scopes because that protocol's routing is entirely topics-based.
To bind and/or unbind a queue to/from a topic exchange, you need to have the following scopes:
| Permission | Example |
write permission on the queue and routing key -> rabbitmq.write:<vhost>/<queue>/<routingkey> | rabbitmq.write:*/*/* |
read permission on the exchange and routing key -> rabbitmq.write:<vhost>/<exchange>/<routingkey> | rabbitmq.read:*/*/* |
| Permission | Example |
write permission on the exchange and routing key -> rabbitmq.write:<vhost>/<exchange>/<routingkey> | rabbitmq.write:*/*/* |
OAuth 2.0 authorisation backend supports variable expansion when checking permission on topics.
It supports any JWT claim whose value is a plain string and the vhost variable.
For example, if a user has connected with the token below against the vhost prod,
they should have write permission to send to any exchange starting with x-prod-
and any routing key starting with u-bob-:
{
  "sub" : "bob",
  "scope" : [ "rabbitmq.write:*/q-{vhost}-*/u-{sub}-*" ]
}
Advanced OAuth 2.0 Configuration Topics
Using a Custom Scope Field
There are some authorization servers which cannot include RabbitMQ scopes into the standard
JWT scope field. Instead, they can include RabbitMQ scopes in a custom JWT scope of their choice.
It is possible to configure RabbitMQ with a different field to look for scopes as shown below:
...
auth_oauth2.additional_scopes_key = extra_scope
...
To test this feature you are going to build a token, sign it and use it to hit one of the RabbitMQ management endpoints.
The command below allows us to hit any management endpoint, in this case it is the overview, with a token.
make curl-with-token URL=http://localhost:15672/api/overview TOKEN=$(bin/jwt_token scope-and-extra-scope.json legacy-token-key private.pem public.pem)
You use the python script bin/jwt_token.py to build the minimal JWT token possible that RabbitMQ is able to
validate which is:
{
  "scope": [

  ],
  "extra_scope": [
    "rabbitmq.tag:management"
  ],
  "aud": [
    "rabbitmq"
  ]
}
Using Multiple Asymmetrical Signing Keys
This scenario explores the use case where JWT tokens may be signed by different asymmetrical signing keys.
There are two ways to configure RabbitMQ with multiple signing keys:
- Statically configure them via
rabbitmq.confas shown in the plugin documentation page. - Dynamically add the keys to a running RabbitMQ node without having to restart it.
First you add a second signing key called legacy-token-2-key whose public key is conf/public-2.pem:
docker exec -it rabbitmq rabbitmqctl add_signing_key legacy-token-2-key --pem-file=/conf/public-2.pem
Adding OAuth signing key "legacy-token-2-key" filename: "/conf/public-2.pem"
And then you issue a token using the corresponding private key and use it to access the management endpoint /api/overview.
make curl-with-token URL=http://localhost:15672/api/overview TOKEN=$(bin/jwt_token scope-and-extra-scope.json legacy-token-2-key private-2.pem public-2.pem)
bin/jwt_token searches for private and public key files under the conf directory and jwt files under jwts.
Using Scope Aliases
This example demonstrates how to use custom scopes with RabbitMQ.
UAA identity provider has been configured with two clients (producer_with_roles
and consumer_with_roles) with the following custom scopes:
producer_with_roles with
api://rabbitmq:producer.
consumer_with_roles with
api://rabbitmq:Read.All.api://rabbitmq:Write.All.api://rabbitmq:Configure.All.api://rabbitmq:Administrator.
For more information about scope aliases, check out the section that explains it in more detail.
How to Configure Scope Aliases
This is the configuration required to map those custom scopes to RabbitMQ scopes.
Since RabbitMQ 4.1, it is possible to configure scope aliases using the ini-like configuration style. Earlier versions only supported the legacy Erlang-style.
auth_oauth2.scope_aliases.1.alias = api://rabbitmq:Read.All
auth_oauth2.scope_aliases.1.scope = rabbitmq.read:*/*

auth_oauth2.scope_aliases.2.alias = api://rabbitmq:Write.All
auth_oauth2.scope_aliases.2.scope = rabbitmq.write:*/*

auth_oauth2.scope_aliases.3.alias = api://rabbitmq:Configure.All
auth_oauth2.scope_aliases.3.scope = rabbitmq.configure:*/*

auth_oauth2.scope_aliases.3.alias = api://rabbitmq:Administrator
auth_oauth2.scope_aliases.3.scope = rabbitmq.tag:administrator

auth_oauth2.scope_aliases.4.alias = api://rabbitmq:producer
auth_oauth2.scope_aliases.4.scope = rabbitmq.read:*/* rabbitmq.write:*/* rabbitmq.configure:*/* rabbitmq.tag:management
RabbitMQ Configuration
In the OAuth 2.0 tutorial repository, there are two RabbitMQ configuration files ready to be used, for UAA:
- conf/uaa/advanced-scope-aliases.config: configures a set of scope aliases.
- conf/uaa/rabbitmq.conf:
configure the rest of oauth2 configuration in addition to configuring
extra_scopeas another claim from where to read scopes from
Demo 1: Launch RabbitMQ with custom scopes in scope field
To launch RabbitMq with scope mappings and with custom scopes in the scope field you run the following command:
ADVANCED=advanced-scope-aliases.config make start-rabbitmq
This command will stop RabbitMQ if it is already running.
Launch a producer application with the client producer_with_roles
make start-perftest-producer PRODUCER=producer_with_roles
To inspect the logs:
docker logs producer_with_roles -f
Launch a consumer application with the client consumer_with_roles
make start-perftest-consumer CONSUMER=consumer_with_roles
To check the logs : docker logs consumer_with_roles -f
Access management api with the client producer_with_roles
make curl url=http://localhost:15672/api/overview client_id=producer_with_roles secret=producer_with_roles_secret
To stop the perf-test applications run :
make stop-perftest-producer PRODUCER=producer_with_roles
make stop-perftest-consumer CONSUMER=consumer_with_roles
Demo 2: Launch RabbitMQ with custom scopes in extra scope field
To launch RabbitMq with scope mappings and with custom scopes in the extra_scope you run the following command:
make start-rabbitmq
This command will stop RabbitMQ if it is already running
You cannot use UAA to issue the tokens because you cannot configure UAA to use a custom field for scopes.
Instead you are going to issue the token ourselves with the command bin/jwt_token.
Launch a producer application with the token producer-role-in-scope.json:
make start-perftest-producer-with-token PRODUCER=producer_with_roles TOKEN=$(bin/jwt_token producer-role-in-extra-scope.json legacy-token-key private.pem public.pem)
To inspect the logs:
docker logs producer_with_roles -f
Launch a consumer application with the token consumer-roles-in-extra-scope.json:
make start-perftest-consumer-with-token CONSUMER=consumer_with_roles TOKEN=$(bin/jwt_token consumer-roles-in-extra-scope.json legacy-token-key private.pem public.pem)
Access management api with the token producer-roles-in-extra-scope.json
make curl-with-token URL="http://localhost:15672/api/overview" TOKEN=$(bin/jwt_token producer-roles-in-extra-scope.json legacy-token-key private.pem public.pem)
To stop the perf-test applications, run:
make stop-perftest-producer PRODUCER=producer_with_roles
make stop-perftest-consumer CONSUMER=consumer_with_roles
Using variable expansion in scopes
There are times when it is convenient to define a scope that uses a variable in either:
- The vhost part of the scope
- The resource and/or in the routing key part
The variable name can be vhost, whose value matches the vhost you are accessing, or any single
value claim in the token, such as user_name.
To demonstrate this feature:
- Start Keycloak Oauth provider and RabbitMQ by following the steps in
Keycloak. Keycloak is already configured to issue tokens with the
scope
rabbitmq.configure:*/q-{user_name}. - Log in to the management UI at
http://localhost:15672with the user namerabbit_admin. - Try to create a queue with the name
test. Expect the effort to fail with an authorization error. - Create a queue with the name
q-rabbit_admin. Expect to be allowed to do this.
There is no configuration required in RabbitMQ, but the version must be RabbitMQ 4.1.1 or later.
Preferred username claims
RabbitMQ needs to figure out the username associated to the token so that it can display it in the Management UI.
By default, RabbitMQ will first look for the sub claim and if it is not found it uses the client_id.
Most authorization servers return the user's GUID in the sub claim rather than the actual user's username or email address, anything the user can relate to. When the sub claim does not carry a user-friendly username, you can configure one or several claims to extract the username from the token.
Given this configuration:
...
auth_oauth2.resource_server_id = rabbitmq
auth_oauth2.preferred_username_claims.1 = user_name
auth_oauth2.preferred_username_claims.2 = email
...
RabbitMQ would first look for the user_name claim and if it is not found it looks for email. Else it uses its default lookup mechanism which first looks for sub and then client_id.
Use Rich Authorization Request Tokens
The Rich Authorization Request extension provides a way for OAuth 2.0 clients to request fine-grained permissions during an authorization request. It moves away from the concept of scopes that are text labels and instead defines a more sophisticated permission model.
RabbitMQ supports JWT tokens compliant with the extension. Below is a sample example section of JWT token:
{
  "authorization_details": [
    { "type" : "rabbitmq",
      "locations": ["cluster:finance/vhost:primary-*"],
      "actions": [ "read", "write", "configure"  ]
    },
    { "type" : "rabbitmq",
      "locations": ["cluster:finance", "cluster:inventory", ],
      "actions": ["tag:administrator" ]
    }
  ]
}
Get the environment ready
To demonstrate this new capability you have to deploy RabbitMQ with the appropriate configuration file under conf/uaa/rabbitmq-for-rar-tokens.config.
export CONFIG=rabbitmq-for-rar-tokens.config
make start-rabbitmq
NOTE: You do not need to run any OAuth 2.0 server like UAA. This is because you are creating a token and signing it using the same private-public key pair RabbitMQ is configured with.
Use a Rich Authorization Token to access the management HTTP API
You are going use this token jwts/rar-token.json to access an endpoint of the Management HTTP API.
make curl-with-token URL=http://localhost:15672/api/overview TOKEN=$(bin/jwt_token rar-token.json legacy-token-key private.pem public.pem)
Note: You are using curl to go to the URL using a TOKEN which you have built using the command bin/jwt_token which takes the JWT payload, the name of the signing key and the private and public certificates to sign the token
Use a Rich Authorization Token to Application authentication and authorization
This time, You are going to use the same token you used in the previous section to access the AMQP protocol via the PerfTest tool which acts as a AMQP producer application:
make start-perftest-producer-with-token PRODUCER=producer_with_roles TOKEN=$(bin/jwt_token rar-token.json legacy-token-key private.pem public.pem)
The command above launches the application in the background, you can check the logs by running this command:
docker logs producer_with_roles -f
For more information on this new capability check out the OAuth 2 guide.